
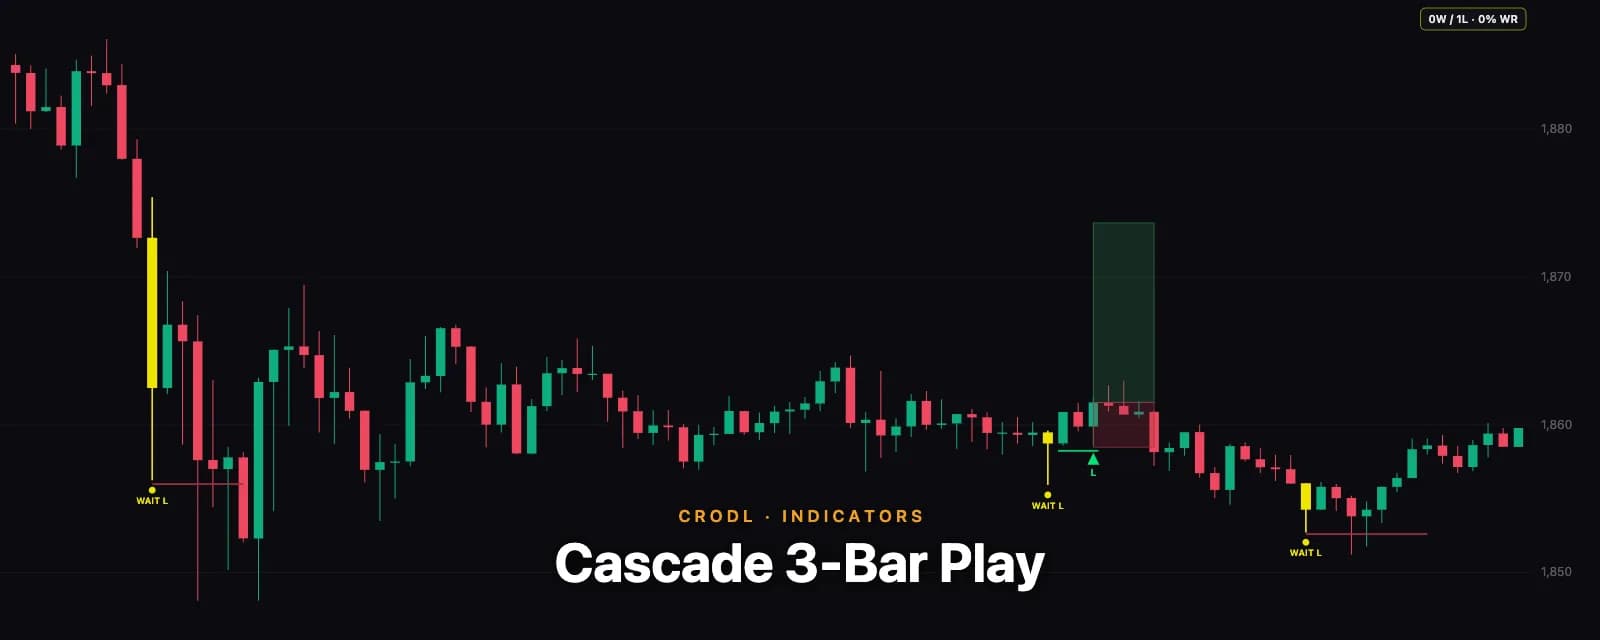
Cascade 3-Bar Play: Fading Stop Runs on Pattern Confirmation
How Crodl's Cascade 3-Bar Play study combines the stop-cascade trigger with a full three-bar play entry — the cascade sets the direction, the play times the entry, and the stop anchors to the play's impulse bar.
Cascade Exhaustion fades a stop run after a single directional close — fast, but a one-candle confirmation is a thin fact. Cascade 3-Bar Play demands the strongest structural evidence in the playbook instead: the same cascade candle sets the direction, but the entry waits for a complete Three-Bar Play in that direction — impulse, rest, breakout — and anchors the stop to the play's structure rather than the cascade's.
The result is a rarer, more demanding signal. That's the point: this is the "wait for the market to prove it twice" version of the cascade fade.
Stage one: the cascade sets the direction
Identical to Cascade Exhaustion's trigger, gate for gate: a closed candle that sweeps the prior 20-bar extreme by an ATR margin, on at least 1.25× ATR range and 1.75× baseline volume, with a cascade-matching body and a same-bar rejection proxy (wick, reclaim, or none). It paints yellow, tags WAIT L (downside sweep — bullish play wanted) or WAIT S, and freezes a cancel level just beyond the swept extreme.
While the setup waits, a bar closing through that cancel level kills it — the cascade resumed, the fade hypothesis is dead. (A wick through survives: unlike Cascade Exhaustion, this level isn't the trade's stop — the stop comes later, from the pattern — so only a decisive close invalidates.)
Stage two: the three-bar play times the entry
Within the wait window (default 8 bars), the study watches for a completed three-bar play in the fade direction, using the same rules as the candlestick-family detector:
- The impulse — a long-bodied bar in the fade direction (measured against the average body of the ten bars before the cascade candle, so the cascade's own monster bar doesn't inflate the yardstick).
- The rest — a small opposite-colour bar (body at most half the impulse's) that closes beyond the impulse midpoint and never retraces past its origin extreme.
- The breakout — a same-colour bar closing beyond the setup's extreme. Entry at that close.
The three play bars get an underline, the entry bar its L/S marker, and the risk/reward zones draw from the entry close: the stop sits beyond the play's impulse bar (its first bar) plus an ATR buffer — per the setup's own logic, the level the pattern must not lose — with the target at Reward : risk × the risk distance (default 1:4). Zones extend until the stop or target is touched, and the optional hit-rate table (off by default) tallies wins, losses, and win rate.
What to expect: this one is rare
Stacking two selective events multiplies their rarity. On liquid crypto at default settings, expect a handful of setups per thousand bars but only one or two completed entries — most setups expire without a textbook play, and some are cancelled by the cascade resuming. The gate funnel is deliberate: an impulse candidate appears in roughly a quarter of the waiting bars, a valid rest bar in a fraction of those, and the breakout close is the final cut. If you want more signals, the honest levers are a longer Max bars to wait, a lower Min candle range, or the Cascade only rejection mode; if you want fewer and cleaner, raise the volume ratio. The design intent, though, is patience — when this indicator finally marks an L or an S, the market swept a level, failed, based, and broke out in your direction, all on closed candles.
Settings that matter
- Detection group — identical to Cascade Exhaustion (lookback, sweep, range, volume, body, double-sweep, cooldown, direction, rejection proxy).
- Max bars to wait (default 8, minimum 3 — a play needs three bars) — how long the yellow setup stays armed for the pattern.
- Show cancel level — the frozen invalidation line while waiting.
- Risk group — stop buffer beyond the impulse bar, reward:risk (default 1:4), retained setups. Zones need no width setting; they run until resolution.
- Style group — yellow candle paint, WAIT/entry markers, hit-rate table, sweep levels, colors, zone opacity.
Honest limitations
Everything that's true of Cascade Exhaustion applies — this is OHLCV inference, not order-flow observation, and confirmation-first means the entry always comes after the turn has begun. The extra stage compounds it: you trade later still, and far less often. The stop anchored to the impulse bar is usually tighter than a cascade-extreme stop, which improves the reward:risk arithmetic but also means ordinary noise can reach it — the hit-rate table exists precisely so you can judge that trade-off per pair and timeframe before trusting it.
Frequently Asked Questions
Does it repaint?
No. The trigger is decided on its own closed bar, the play on closed bars, the entry on the play's closed breakout bar — all reference values are prior-bar. Setups, entries, and zones never move once drawn.
How is this different from running Cascade Exhaustion and the Three-Bar Play separately?
Coupling. The standalone Three-Bar Play fires anywhere; here it only counts inside a cascade setup's window and direction, the impulse yardstick is anchored to the pre-cascade tape, and the trade geometry (impulse-bar stop, cascade cancel level) binds the two stages into one setup. Running both separately would also mark plays with no cascade behind them.
Why did my yellow candle expire without an entry?
Most do — that's the filter working. A textbook impulse-rest-breakout sequence in the fade direction within a few bars of a stop run is a genuinely rare event. The WAIT marker and cancel level show you the setup was live; expiry means the market never produced the pattern.
Why is the stop on the impulse bar and not the cascade candle?
Because the entry's logic is the play, not the sweep: if price trades back through the play's origin, the pattern that justified the entry has failed — regardless of what the cascade extreme is doing. It's also usually tighter, which the 1:4 default puts to work.
Two confirmations, one trade
Cascade 3-Bar Play is live in the indicator picker on every Crodl terminal chart. Run it beside Cascade Exhaustion on the same pair: same triggers, two entry philosophies — and let the hit-rate tables tell you which one earns its place on your timeframe.
This article is for educational purposes only and is not financial advice. Leveraged trading carries substantial risk of loss. Always do your own research and never risk more than you can afford to lose.

Ready to automate your trading?
Connect your exchange, set up automations, and start trading smarter — all from one platform.
Start Trading Free