
Block Shift
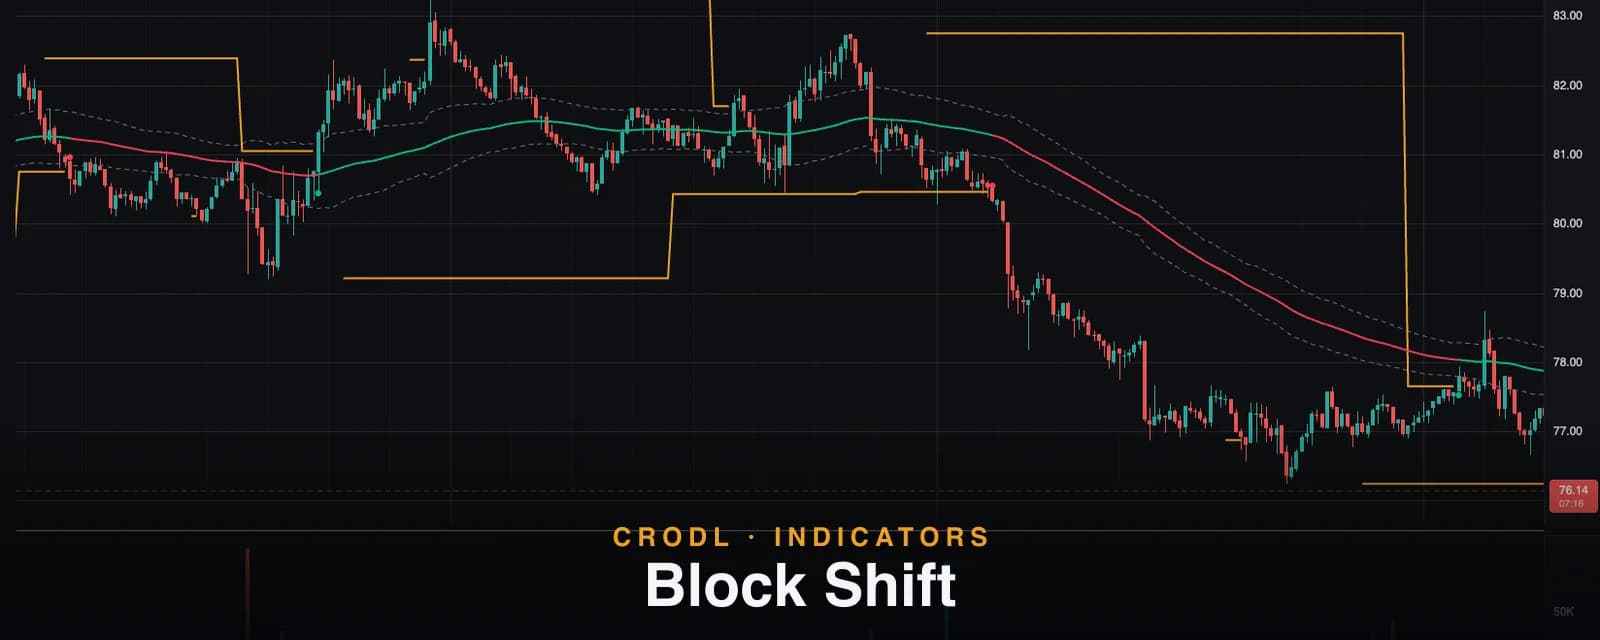
Crodl's Block Shift indicator flips trend only when a candle closes through the last confirmed swing block — structural breaks, drawn and consumed on the chart.
Ask a structure trader when a trend actually changes and you will not hear anything about moving averages. You will hear about levels: the trend turned up when price broke that swing high, and not a bar before. The problem is discipline — on a live chart it is remarkably easy to convince yourself that a wick, a near-miss, or a strong candle "basically" broke the level.
Block Shift, a CRODL original on the Crodl terminal, encodes that structural rule so it cannot be negotiated with. It finds confirmed swing highs and swing lows, draws each one as an orange block extending to the right, and flips its trend state on exactly one condition: a candle closing through the block. Close above the last swing-high block and the trend is bullish. Close below the swing-low block and it is bearish. Nothing else — not an EMA cross, not a volatility spike, not a 99% wick — changes its mind.
It is the structural sibling of Volume Shift: the same colored-EMA presentation and the same refusal to flip cheaply, but where Volume Shift demands distance from the average, Block Shift demands a broken level.
What Block Shift shows
Four layers, all on the price chart:
- Blocks — horizontal orange lines at the most recent confirmed swing high (the resistance block) and swing low (the support block). Each extends right, bar after bar, until price closes through it — at which point it is consumed and disappears.
- A colored EMA basis — a 100-period EMA painted green while the state is bullish, red while bearish, and gray while it is still neutral (before the first break).
- An ATR envelope — dashed lines at EMA ± 1.0 × ATR. This is volatility context only; it plays no part in the flip logic.
- Break markers and alerts — a triangle on each flip bar, plus
bull_breakandbear_breakalert conditions so structural breaks can page you.
How it works on the Crodl terminal
Block Shift ships as a Rune preset — one click from the indicator picker, with the full script open to inspection. The mechanics have three stages: confirm, hold, consume.
Confirming a block. A swing high qualifies when it is the highest high among the Block pivot strength bars on each side — 15 by default (range 2–100). That means a pivot is confirmed 15 bars after it prints; the block then appears at the pivot price. Swing lows mirror the logic on the low side. Only one block is active per side: a newer confirmed pivot replaces the previous block at its new level.
Holding. While no block is broken, the trend state simply carries forward. The state starts neutral, and stays wherever it is through pullbacks, EMA crosses, and envelope touches. The block level itself never moves once drawn.
Consuming. The first candle that closes beyond a block does two things at once: it flips the trend state, and it consumes the block — the level vanishes, because the resistance (or support) it represented has been spent. Precisely:
- Close above the active resistance block → trend flips bullish, resistance block consumed.
- Close below the active support block → trend flips bearish, support block consumed.
- Any other bar → the state holds. There is no third flip condition.
One subtle consequence worth understanding: after a bullish break consumes the resistance block, there is no resistance block at all until the next swing high confirms. The trend cannot re-flip bullish (it already is), and it can only turn bearish by closing through the support block below. The indicator is comfortable having nothing overhead — that is what a broken market looks like.
| Element | Default | Role in the flip logic |
|---|---|---|
| Resistance block | Last confirmed swing high (strength 15) | Close above it → bullish flip, block consumed |
| Support block | Last confirmed swing low (strength 15) | Close below it → bearish flip, block consumed |
| EMA basis | 100-period | Display only — colored by the state |
| ATR envelope | EMA ± 1.0 × ATR(14) | Display only — volatility context |
The EMA Length (2–500), ATR Length (1–200), and ATR Envelope multiplier (0–10) shape the visual context; Show blocks and Show ATR envelope toggle the layers. But the flip is gated by the break alone.
How traders use it
Honest breakout confirmation
The close-through-the-block rule is a built-in defense against the most expensive habit in breakout trading: buying the wick. A candle that spikes through a swing high and closes back under it flips nothing — Block Shift treats it as what it usually was, a liquidity grab. Those failed sweeps are exactly the events mapped by the Liquidation Levels indicator, and the pairing is natural: liquidation clusters show where sweeps are likely, Block Shift tells you whether the move through the level was a sweep or a break.
Trading with the structural state
Swing traders use the EMA color as a bias that only market structure can change: longs while green, shorts while red, flat or discretionary while gray. Because a flip requires a 15-bar-confirmed pivot and a closing break of it, state changes are rare and each one is meaningful.
Stops behind the block
An active block is a defended level by construction. Placing stops just beyond the block — rather than at an arbitrary distance — anchors risk to the same structure the indicator watches, and the ATR envelope gives you a volatility-aware sense of how much room "just beyond" should be.
Tuning pivot strength
Strength 15 finds meaningful swings on any timeframe. Drop it toward 5 and blocks form faster from minor structure — more flips, quicker signals, more noise. Raise it toward 30 and only major swing points count. The parameter is the indicator's entire personality.
Frequently Asked Questions
Why did a block suddenly disappear?
Two possibilities: price closed through it (consumed — and the trend flipped on that bar), or a newer swing pivot confirmed and replaced it at a different level. Blocks never simply expire.
Does Block Shift repaint?
A pivot needs pivot strength bars on both sides, so a block appears 15 bars (by default) after the swing actually printed — confirmation lag, standard for any pivot-based tool. Once drawn, the block never moves, and flips are evaluated on closes, so a completed flip never un-happens.
A wick pierced the block but nothing flipped. Bug?
By design. Only a close beyond the block flips the state. Wicks through a level are treated as sweeps, not breaks — that distinction is most of the reason the indicator exists.
How is this different from Volume Shift?
Same skeleton — EMA basis, hysteresis, flip markers, alerts — different gate. Volume Shift flips when price closes a full ATR-deadband beyond its average; Block Shift flips only on a closing break of confirmed swing structure. Distance versus structure. Many traders run both and pay attention when they agree.
Let structure call the trend
Block Shift is available on every Crodl terminal chart — add it from the indicator picker and the blocks, colored basis, and break alerts are on your pair in one click, alongside live trading on six exchanges.
This article is for educational purposes only and is not financial advice. Leveraged trading carries substantial risk of loss. Always do your own research and never risk more than you can afford to lose.

Ready to automate your trading?
Connect your exchange, set up automations, and start trading smarter — all from one platform.
Start Trading Free