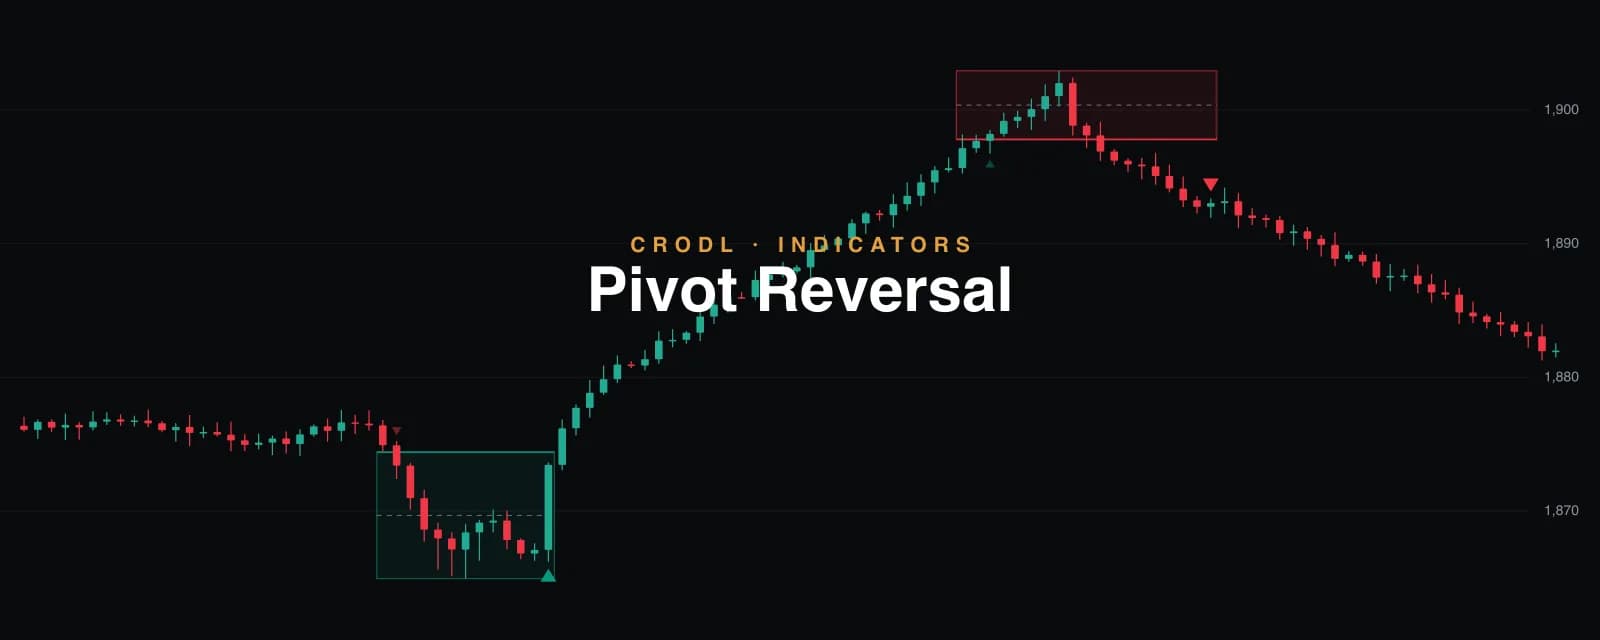
Pivot Reversal: When the Break Is the Trap
How Crodl's Pivot Reversal turns failed pivot breaks into signals — every break arrow draws its zone from the broken level to the flush extreme, and the reversal fires when price recloses through the level: long on a failed breakdown, short on a failed breakout.
Every breakout trader knows the sting: the level breaks, you jump in, and price immediately comes back through your entry. Pivot Reversal is built on the opposite premise — that a Pivot Levels break arrow is often the trap, not the invitation. It never chases the arrow. It draws the battlefield and waits for the failure.
On live crypto tape the premise holds embarrassingly well: running the defaults across BTC, ETH and SOL, roughly four out of five pivot breaks get reclaimed within thirty bars. The break was the liquidity grab; the reclaim was the trade.
How it works
- The break — every chart-timeframe Pivot Levels break arrow (imported from the actual Pivot Levels engine, so the zones sit exactly on its arrows — no alternation here: every break is a reversal candidate).
- The zone — from the broken level (the emphasized edge) to the break move's extreme, with a dashed midline. While armed, the zone's extreme develops with the continuing flush — stop runs usually dig deeper before they fail — and the level edge stays frozen. One zone per fight: a fresh same-side break near an armed zone's level adds nothing.
- The reclaim — the signal. When price closes back through the broken level (wick mode optional, plus an optional ATR buffer), the break has failed: a long arrow on a failed breakdown, a short arrow on a failed breakout. The zone freezes at that bar.
- The expiry — a zone whose reclaim never comes dies quietly after
Zone lifetimebars (default 30). The break was real; there is no reversal to trade.
Zones are coloured by the trade they set up: teal below price (failed breakdown → long), rose above (failed breakout → short). Everything computes on closed candles — resolved zones and fired arrows never change.
How traders use it
- The stop-hunt fade — the annotated classic: support breaks, longs get stopped, price bases inside the zone, then recloses above the level. That reclaim bar is the entry, the flush extreme is the natural stop, and the crowd's stops above fuel the move.
- With Pivot Levels running — the arrows are shared, so you see both readings at once: the break if it holds, the reversal if it fails. The zone is the referee — which side of the level price closes on decides.
- Depth as quality — a reclaim from beyond the zone's midline swept more stops than a shallow poke; many traders only take the deeper ones. The midline is drawn for exactly that judgement.
- Opposite personality to Pivot Levels Strategy — that one trades the break, this one trades its failure. Same engine, mirrored conviction; run the two on your market and let the tape tell you which side it pays.
Settings
- Signal detection — the Pivot Levels chart-TF detector (Structure HH→LH default / Confirmed pivot / Slope turn), pivot length, and the break buffer.
- Reversal — reclaim confirmed by close (default) or wick, an optional ATR reclaim buffer, and the zone lifetime.
- Style — zones, the midline, the reversal arrows, and the two colours.
Honest limitations
A reclaim says the break failed — it doesn't say how far the reversal travels; strong ranges reclaim levels all day in both directions, and in chop this fires often (raise the break buffer or detection length to slow it down). The zone extreme develops while armed, which is honest development of the newest object, not a repaint — frozen zones never move. And expiry is a timer, not a verdict: a break that runs for thirty bars simply was a real break.
Frequently Asked Questions
Does it repaint?
No. Break arrows come from the non-repainting Pivot Levels engine, reclaims evaluate on closed candles, and a resolved zone (reversed or expired) never changes. Only the newest armed zone develops its extreme.
Why did a break arrow not get a zone?
One zone per fight: if a same-side zone at that level was still armed, the fresh arrow is the same battle continuing, not a new one.
How is this different from Breakout Retest?
Breakout Retest trades the break succeeding — a return to the flipped level that holds. Pivot Reversal trades the break failing — a reclose through the level that un-flips it. Same location, opposite outcome, and between them the two cover both resolutions of every contested level.
Which detection mode should I use?
Structure (the default) reacts fastest and gives the most zones; Confirmed pivot is stricter and slower; Slope turn sits between. The screenshots that inspired this ran the default.
Trade the failure
Pivot Reversal is live in the indicator picker on every Crodl terminal chart. Put it next to Pivot Levels, stop chasing arrows, and start fading the traps that used to catch you.
This article is for educational purposes only and is not financial advice. Leveraged trading carries substantial risk of loss. Always do your own research and never risk more than you can afford to lose.

Ready to automate your trading?
Connect your exchange, set up automations, and start trading smarter — all from one platform.
Start Trading Free