
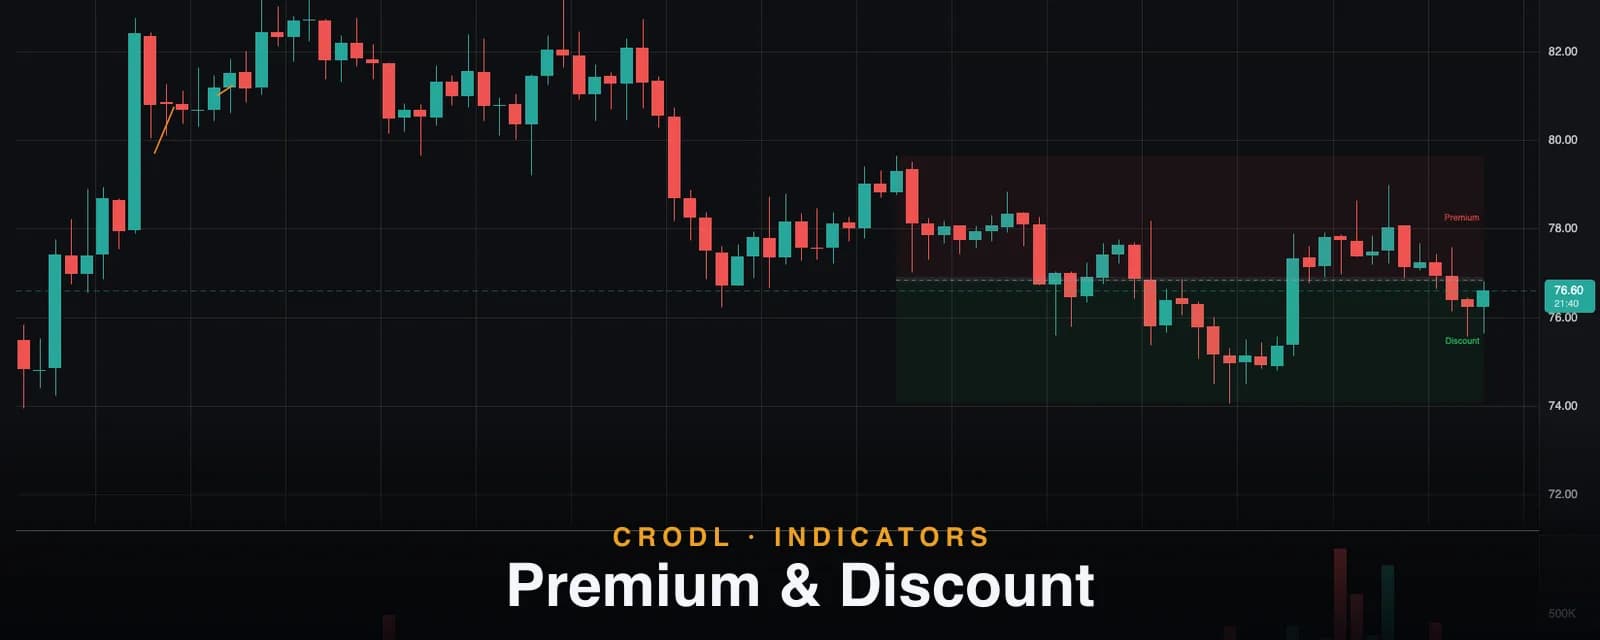
Premium & Discount
Premium and discount zones split the dealing range at equilibrium. How Crodl anchors the range to confirmed swing pivots and draws the 50% band and optional OTE zone.
"Buy low, sell high" is the oldest advice in markets — and the least actionable, because it never defines low or high. Smart Money Concepts (SMC) gives it teeth: take the current dealing range — the span between the last significant swing high and swing low — and split it at the 50% midpoint, called equilibrium. Everything above equilibrium is premium, where selling is favored; everything below is discount, where buying is favored. Suddenly "low" has a number.
The Premium & Discount indicator on the Crodl terminal draws this framework live. It anchors the dealing range to objectively confirmed swing pivots, shades the premium and discount halves, marks equilibrium with a band and midline, and can optionally draw the OTE (Optimal Trade Entry) pocket — the 61.8%–79% retracement zone ICT traders treat as the sweet spot for entries. This post covers the concept, the exact anchoring rules, and how traders use the zones.
What premium and discount show
Every tradeable range has a fair-value midpoint. Institutions working large positions do not chase — they buy when price is in the cheap half of the range and sell when it is in the expensive half, which is precisely what pushes price back toward equilibrium over and over. Trading with that behavior means one rule: longs in discount, shorts in premium. The same trade idea taken at 30% of the range and at 70% of the range are two very different bets, even if the chart pattern looks identical.
The OTE zone refines this further. Rather than buying anywhere in discount, ICT-style traders wait for a retracement into the 61.8%–79% pocket of the impulse — deep enough that the entry is genuinely cheap, not so deep that the structure is failing. It is opt-in on Crodl because not everyone trades it, but when enabled it draws exactly that pocket.
How it works on the Crodl terminal
- Find the dealing range. The range is the last confirmed swing high paired with the last confirmed swing low. A swing high must be strictly higher than every bar within
Swing lengthbars (default 10) on both sides — plateaus reject — and it confirms only once the right half of that window has closed. No lookahead, no hand-picked anchors. - Partition it. With the range low at 0% and the high at 100%: premium fills 50%→100% (red wash), discount fills 0%→50% (green wash), and equilibrium is drawn as a thin band around the midpoint — sized by
EQ band (% of range), default 2% — plus a dashed line at exactly 50%. - Optionally draw OTE. The OTE band covers the 61.8%–79% retracement of the range, and it is direction-aware: in an up-range (the swing high is more recent), the retracement measures down from the high, so the band sits at 21%–38.2% of the range — inside discount. In a down-range it mirrors to 61.8%–79%, inside premium. The band is amber and always sits on the pullback side you would actually be entering from.
- Re-anchor only on confirmation. A close beyond a range extreme does not stretch the range immediately. The breakout leg becomes the new extreme only once its own swing pivot confirms,
Swing lengthbars after the new extreme prints. Until then the old range holds — so the zones don't flip-flop mid-breakout. In the brief degenerate state after a violent one-sided move (last swing high at or below the last swing low), nothing is drawn rather than painting an inverted range.
All fills run from the range's starting pivot to the current bar, with right-edge labels — Premium, Discount, EQ, OTE — so the map reads at a glance.
| Zone | Position in range | Default color | Role |
|---|---|---|---|
| Premium | 50% → 100% | Red wash | Favored area to sell or take long profits |
| Equilibrium | Band around 50% (default 2% of range) | Gray band + dashed midline | The fair-value pivot of the range |
| Discount | 0% → 50% | Green wash | Favored area to buy or cover shorts |
| OTE (opt-in) | 61.8% → 79% retracement | Amber band | The classic ICT entry pocket |
Settings that matter
- Swing length (default 10) — how major a pivot must be to anchor the range. Larger values track bigger, slower ranges.
- EQ band (% of range) (default 2) — the height of the equilibrium band.
- OTE zone (61.8–79%) (default off) — draw the retracement pocket.
- Zone labels (default on) — the right-edge tags.
- Colors — discount, premium, equilibrium, and OTE are each independently themeable.
How traders use it
As a location filter
The highest-value use is also the simplest: refuse longs in premium and shorts in discount. Combined with trend from the Market Structure indicator, this becomes the core SMC playbook — a bullish Break of Structure sets the direction, and the discount half of the new range defines where a pullback entry is even allowed.
OTE entries
With the OTE band on, the entry model tightens: wait for the retracement to reach the pocket, then look for a reaction — ideally at a level that exists for its own reasons, like an order block or a fair value gap sitting inside the band. Zone-plus-zone confluence is what separates an OTE entry from catching a falling knife at a Fibonacci number.
Equilibrium as the tell
The midline is a decision level. Ranges that repeatedly reject at equilibrium are respecting the framework; a clean acceptance through it signals the other half of the range is likely to be explored. Watching how price treats the EQ band after a sweep of the range extreme is one of the fastest reads on intent.
Frequently Asked Questions
Why didn't the range move when price broke the high?
By design. The breakout only becomes the new range extreme once its own swing pivot confirms — Swing length bars after the new high prints. Instant re-anchoring would redraw the zones on every poke; confirmation-based re-anchoring keeps them stable exactly when you need them most.
Why is the OTE band below the midline?
Because the retracement is direction-aware. In an up-range you are retracing down from the high, so the 61.8%–79% retracement lands at 21%–38.2% of the range — in discount, where a long entry belongs. In a down-range the band mirrors into premium.
Why is nothing drawn on my chart?
Either there is not enough loaded history for a confirmed pivot pair (a pivot needs Swing length bars on both sides), or the range is momentarily degenerate — the last confirmed swing high sits at or below the last confirmed swing low after a violent move. The range reappears as soon as a fresh pivot confirms.
Does it repaint?
The range is anchored to confirmed pivots and never follows the live close around. The only live-bar effect is that the newest bar is the final bar of a pending pivot's confirmation window — a new intra-bar extreme can still veto that pending pivot. Once the bar closes, confirmations are permanent.
Trade the cheap half
Premium & Discount is available on every Crodl terminal chart — add it from the indicator picker and the dealing range, equilibrium, and OTE pocket are mapped live on your pair, alongside trading on six exchanges.
This article is for educational purposes only and is not financial advice. Leveraged trading carries substantial risk of loss. Always do your own research and never risk more than you can afford to lose.

Ready to automate your trading?
Connect your exchange, set up automations, and start trading smarter — all from one platform.
Start Trading Free