
Deadband
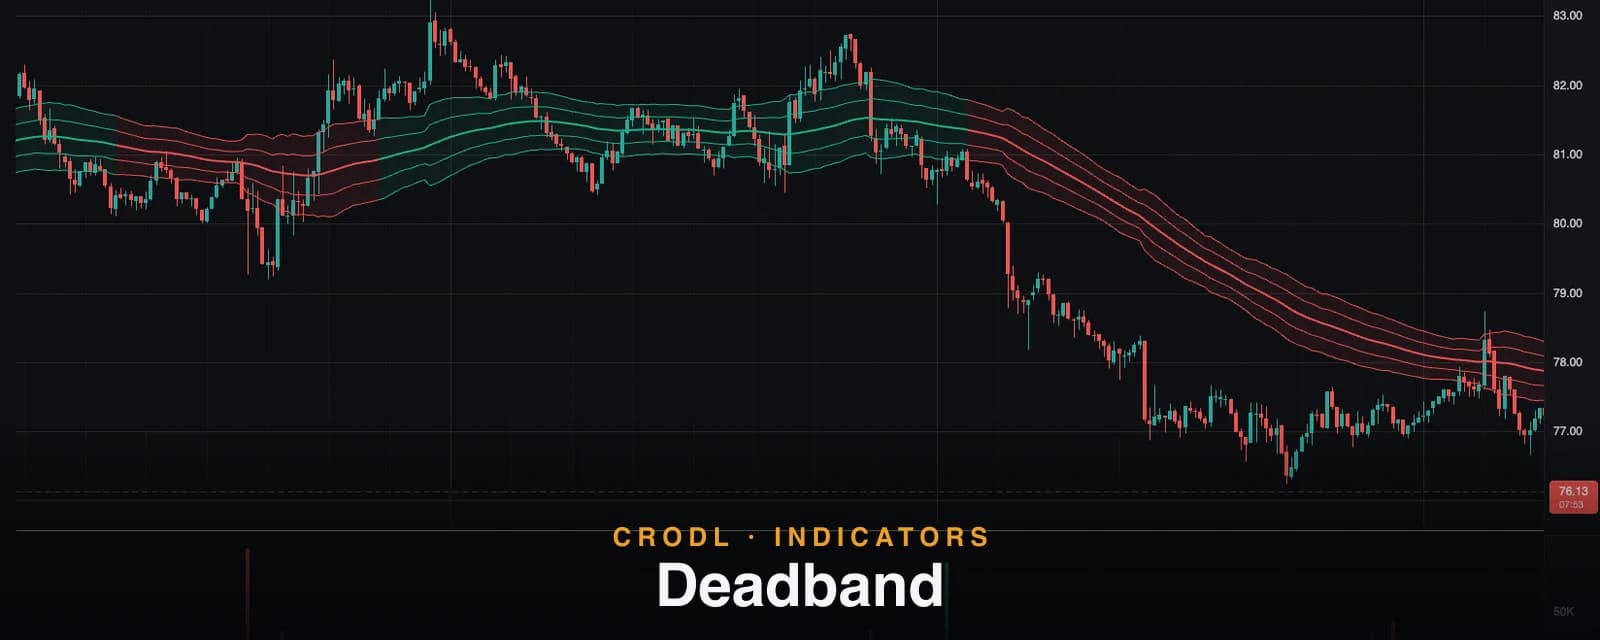
Crodl's Deadband indicator colours an EMA 100/ATR channel only when its band state and the EMA 50/200 regime agree — a consensus trend filter with no signals to chase.
Most trend indicators have one opinion and change it too easily. A band flips colour because price poked through it; a moving-average pair flips because two lines kissed. Each read is defensible on its own — and each one, alone, gets faked out constantly. Crypto's favourite trick is satisfying one definition of a trend change while failing every other.
Deadband, a CRODL original on the Crodl terminal, is built on a stricter idea: require two independent definitions of the trend to agree before anything changes colour. One is a responsive, hysteresis-gated price channel — a 100-period EMA wrapped in ATR bands. The other is the slow EMA 50/200 regime that position traders have used for decades. Only when the fast read and the slow read point the same way does the channel flip; while they disagree, it holds its previous colour, however long the argument lasts. That mutual veto is the "deadband" — the zone of disagreement in which nothing happens.
And deliberately, that is all it does. Deadband draws no arrows, prints no signals, fires no alerts. It is a context layer — a channel that tells you which way the market has proven itself — designed to sit under faster tools rather than compete with them.
What Deadband shows
Everything Deadband draws is one channel, painted in one of three colours:
- The middle line — a 100-period EMA, the channel's spine, tracked on the price axis.
- Outer bands — middle ± 1.25 × ATR(14), the channel's edges.
- Inner half-bands — at half the outer distance (± 0.625 × ATR by default), togglable, useful as early-warning levels inside the channel.
- A faint shaded fill between the outer bands.
Every element carries the same colour at all times: green (#19b189) when the consensus is bullish, red (#e85052) when bearish, gray (#7e8894) while neutral — which is the state at the start of a chart, before the two engines have ever agreed.
How it works on the Crodl terminal
Deadband ships as a Rune preset — add it from the indicator picker and the script is fully inspectable. Under the hood are two engines and one consensus rule.
Engine one: the band state. The middle is EMA(close, 100) (Middle EMA length, 2–500) with outer bands at ± 1.25 × ATR(14) (Outer band width, 0.25–10; ATR length, 1–200). The state seeds on the first live bar — bullish if the close is at or above the middle, bearish below — and from then on flips only when price closes beyond the opposite outer band: a close above the upper band turns it bullish, a close below the lower band turns it bearish, and anything in between holds. That is the same hysteresis machine that powers Volume Shift, here with a slightly wider 1.25 multiplier.
Engine two: the regime. A 50-period EMA against a 200-period EMA (Regime fast/slow EMA) — the classic golden-cross/death-cross regime read covered in our EMA guide. Fast above slow is bullish, below is bearish.
The consensus rule. The channel's colour flips to bullish or bearish only on a bar where the band state and the regime agree. On any bar where they disagree — or where the band state is still warming up — the colour simply holds whatever it was. There is no timeout and no tiebreaker; a disagreement can persist for fifty bars and the channel will patiently keep its old colour for all fifty.
| Band state (EMA 100 / ATR) | Regime (EMA 50 vs 200) | Channel colour |
|---|---|---|
| Bullish | Bullish | Flips / stays green |
| Bearish | Bearish | Flips / stays red |
| Bullish | Bearish | Holds previous colour |
| Bearish | Bullish | Holds previous colour |
| Warming up | Any | Holds (gray at chart start) |
This is why Deadband is quiet in exactly the places other tools are noisy. A sharp rally inside a downtrend can close above the upper band — the fast engine flips bullish — but if EMA 50 is still under EMA 200, the channel stays red. If the rally is real, the regime eventually confirms and the flip happens late but honestly. If it was a bear-market bounce, the channel never flipped at all.
How traders use it
As the regime behind faster signals
Deadband's core job is to be the veto layer. Run a signal-generating tool on top — Supertrend flips, Volume Shift triangles, your own entries — and only take the ones that agree with the channel colour. Because the colour requires consensus to change, it is much harder to whipsaw than any single-engine filter, and it costs you nothing in screen noise: no markers, ever.
Reading the inner half-bands
The inner bands split the channel into zones. In a green channel, price riding between the inner and outer upper bands is trending with pressure; a pullback through the middle to the lower inner band is a routine retracement inside an intact trend; the outer band beyond is where the band-state engine's flip threshold waits. Traders use the inner lines as staged reaction levels — first touch, add or trim — with the outer band as the line in the sand, sized in the same ATR units they use for stops.
Respecting the hold
The counterintuitive skill with Deadband is trusting the colour when it refuses to change. A red channel under a screaming two-day rally is not lag — it is the indicator reporting that the slow regime has not confirmed. Traders who use it well treat disagreement periods as reduced-size, reduced-conviction conditions rather than assuming the channel is wrong.
Tuning it
Widen Outer band width and the fast engine flips less often; shorten Regime fast/slow (say 20/50) and the regime confirms sooner. Both dials move the same trade-off: earlier flips versus fewer false ones. The defaults — 100/14/1.25 and 50/200 — are deliberately conservative.
Frequently Asked Questions
Why doesn't Deadband draw buy/sell arrows?
By design. It answers one question — "what has this market proven?" — and leaves entries to tools built for them. If you want flip markers with a similar hysteresis engine, that is exactly what Volume Shift provides.
Price closed above the upper band but the colour didn't change. Why?
The regime disagreed. A close beyond the outer band flips only the fast engine; the channel colour needs EMA 50 to be on the same side of EMA 200. Check the two regime EMAs — the moment they concur with the band state, the colour flips.
What are the inner half-bands for?
Structure inside the channel. They sit at exactly half the outer-band distance and make pullback depth legible at a glance: middle = routine, inner band = deep but normal, outer band = the fast engine's flip threshold. Toggle them off with Show inner half-band if you prefer a cleaner channel.
Does it repaint?
Closed bars are final. The channel colour on the forming bar can change until that bar closes (both engines read the live close), which is standard for close-based tools. Historical colours never rewrite.
Trade with proven trend, not hopeful trend
Deadband is available on every Crodl terminal chart — add it from the indicator picker and the consensus channel is under your price action in one click, alongside live trading on six exchanges.
This article is for educational purposes only and is not financial advice. Leveraged trading carries substantial risk of loss. Always do your own research and never risk more than you can afford to lose.

Ready to automate your trading?
Connect your exchange, set up automations, and start trading smarter — all from one platform.
Start Trading Free